|
|
|
|
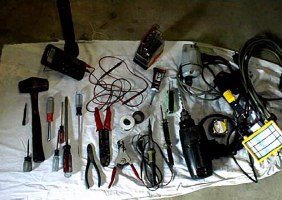
One of the first things you will want to do is to get together some of the tools you will be needing for the job... you can borrow them from a friend or you may want to purchase them when you order the trunk release kits. Here is a short list of tools you might need.
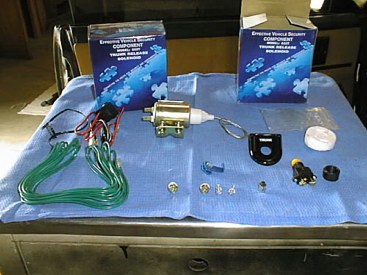
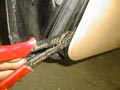
Electric Tester (a digital volt ohm meter is preferable, but a test light will do) Extra light, i.e.. flashlight, trouble light ect... the insides of the doors tend to be a little dark Nice set of drill bits, standard sizes and a good drill Tape Measure Torx set screw drivers Door panel clip tool (in a pinch a pair of thin electrical pliers will work (see photo) Scratch awl Center Punch Good heavy hammer 7 mm Nut driver (or a 7mm socket and driver handle) *Most fasteners on interior are 7mm Straight and Phillips Screwdrivers Cutting Dikes Wire strippers Soldering Iron Solder Electrical Tape or heat shrink tubing Small Hex Wrenches RTV Silicone (black) These are your most basic tools and all of them can be found at your local Wal-Mart. If you have these, you should be able to pretty much complete your job without having to hunt down extra tools. Next you will need some parts. First you will need to order two Remote Hatch Release Kits from DEI (alarm System Components offered by most sterio and electronics shops, Best Buy, Circuit City, Auto Sound, L&H Mobile Electronics are my local stores that carry them.) You will also want a couple of 30 amp automotive relays. Those can be purchased at Radio Shack, or automotive stores such as O-Rileys, Advanced Auto Parts, Car Quest, NAPA, etc. And if you want to open the doors electrically inside the car without the remote, I recommend a couple of small inconspicuous buttons. I used the factory Door lock buttons. I placed it in the center console and made the "lock" open the drivers door and the "unlock" open the passenger side. (See Pic) Here are the contents of the kit. 1.
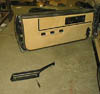
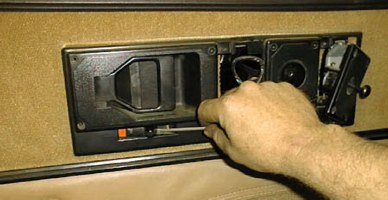
Heavy Duty Solenoid 2. Wires 3. Cables and clips 4. Heavy Duty Button (unnecessary) 5. Mounting for Button (also not used) One of the first things you may want to do is hook up a charger to your car battery to keep it from running down while the doors are ajar. Or you may disconnect the battery to prevent it's discharge. The next step is to disassemble the door. You will need to remove the arm rest. There are three or four Torx Head Screws holding this item in place. Don't forget the one towards the top of the arm rest. Then you will want to remove the lock cover, (see pict) and remove the plastic cover plate
over the handle area. There are certain screws to remove (see Pict) don't try to crank them all out. Then you will have to hold the plastic switch cover in a 45 degree angle to get it to clear the door lock push rod, and the inside door handle. (See Pict)
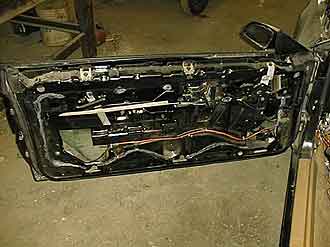
Finally you are ready to remove the inside door panel Now you will need to be careful of it because it is only a type of cardboard that can be damaged and if you pull the holes out that hold in the clips the door
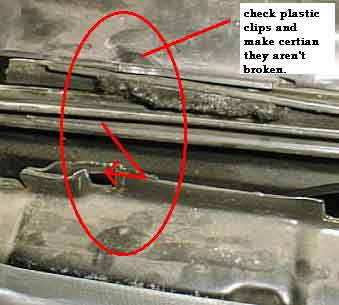
panel will not fit tightly against the door. The most recommended way is to use a door panel clip extracting tool... it is shaped like a flat open end wrench. If you don't have that a thin pair of electrical pliers will work. You will need to gently pull out on the panel and look between it and the door to find the plastic clips. They are in about on inch on the panel You will then want to get the tool or pliers around the clip and pry out against the door on the clip to pull the clip out of the steel door. (See Pict) once all the clips are loose (make sure your window is down) the plastic top must come up to the panel off.
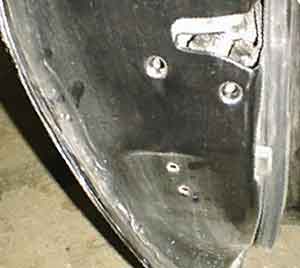
Now this is kinda tricky because the top plastic part must be "pushed in" as well as "pulled up" (see Pict) if you don't do that you risk breaking the door sill clips. Once you do this the panel is off. You will want to inspect the padded window guides bolted to the top of the door sill for ware. If the soft cloth is worn down to bare metal...REPLACE THEM!!! You should see the factory plastic dust cover now covering the access holes on the steel door. It's held in place with a type of silicone....carefully remove it and keep it. You can re-glue it with silicone when you are finished. Now you need to pick a good spot to mount the door solenoids. (See Pict)
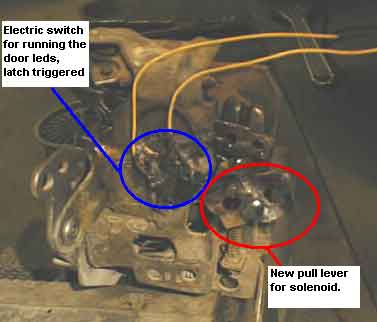
I picked the door jam. Down toward the bottom is a nice flat spot I was able to mount it to. You will want to be sure that the window doesn't come in contact with it when it is rolled up or down. Using a tape measure, measure the distance for the holes.... and then measure them on the door. Using a scratch awl, mark the holes. Then use the center punch and hammer and make a small dimple for the drill bit. Then use the correct size bit. (one that is just a little larger than the bolt) and drill the two holes for the solenoid. Using the factory cable and clips you can simply attach the cable to an existing pull rod that opens the door latch. (that would be either the pull rod going to the inside handle or to the outside handle.) Or if you want to experiment some you can weld a new pull lever on the latch like I have done. (See Pict)
Next step is to run a couple of wires from the solenoid to the inside of the car. You will have to take the bottom covers off of the dash for this. (7mm screw heads) You will want to run the wires in as close to factory wires as possible for a nice professional look. (See Pict)
Now you are about ready to reassemble the door. You will want to test out the latch a few times to make sure the Solenoid is adjusted properly to unlatch the door. (if you have fairly good rubber weather stripping on the door, that alone will provide enough pressure to push the door open once it is unlatched, without the use of extra springs) The wiring of the door solenoid is fairly simple the black wire hooks up to the chassis ground and the red goes to a +12 volts. Once you are sastified with the way the door unlatches you can put the door back together. One addition you might want to make, is to add some sound deadening. The older F-bodys were notorious for being somewhat loud in regards to road noise. I purchased a foil backed padding from a catalog company (JC Whitney) and cut out some sound deadening pads to go under the door panels. You will want to inspect your clips before pressing the door panel back in place. If you have any broken ones replace them. They can be found at a automotive parts store. You will want to install the door sill plastic top first, then when you get ready to press the plastic clips into the steel holes you don't want to just strike them with your fist, but rather take the time to look in-between the door panel and the door to make sure the clips line up with the holes. That way you can keep from breaking them when you press them back in. The rest of the procedure is like removal only reversed. Now on wiring the solenoids up. This is a fairly simple operation if you understand the concept of automotive relays. (and they are fairly simple too) A relay is an electric switch designed to switch high current loads. A normal switch won't last as long because each time the switch is turned on and off it creates a small arc of electricity which will eventually burn out the switch. A relay is built more like the points on a distributor on a car. So it will handle higher amps. (that's why most people wire up driving lights with relays) Another good reason for using relays is you can use a small amount of electricity to control a larger amount. The longer a wire is the more resistance it creates. So on an application like driving lights... if you can wire up a short heavy wire to the relay and then to the lights from the battery. And then switch that relay on with a longer wire that goes all the way into the interior of the car. You will loose virtually no current from the battery to the light. Which will result in a brighter light. Also because the longer wire is handling a smaller amount of current, you can use smaller wire. On the driving lights on my car I am using computer mouse cables and printer cables running from my buttons to the relays that actually turn on the lights. Those wires are quite small but adequate for controlling the light. Finally another benefit of using a relay is that you can take either a switched ground or a switched positive to control either a positive or a ground on a device. If you use a switched ground for instance to control something, if anything were to happen to the wire running to the switch... it will just ground out. And be less likely to create a fire hazard. :-) Now on a relay there are four terminals. (some have five, but for now let's stick with the ones that have four) If you look on the relay, almost all of them are labeled with a drawing. It will show two terminals connected by what looks like a "slinky" or a coil spring. That would be the diagram for the electro magnet. How this works is when there is a positive and a negative hooked up to these two terminals, the magnet becomes Magnetic. When there is no current, it is non magnetized. That magnetic pull is what turns the switch on and off. The other two terminals are for the switch. You wire one to the device and the other to the current source. On my car I put in two relays under the dash. I wired a ground wire (ground to chassis under the dash, to the door lock switch. There are three terminals on the power lock switch. The middle one is ground (-12volts) and then the other two are ground when the buttons are pushed. I wired these other two wires coming off the power lock switch to the electromagnet portion of the relays. (One for each relay) On the other terminal of the magnet side of the relay I wired to a constant +12 volts. Now with that done, when you push the button you should hear the relay click. That shows the magnet is closing the switch. Then I wired a constant +12 volts to a terminal on the fuse block that is constant +12 volts. The other side goes to the red wire under the dash that is wired to the solenoid. The black wire from the solenoid goes to a chassis ground under the dash. That should about have the doors done. Now if you want to make the doors remote activated (like by an alarm system. Then wire the switched ground wire that goes from the buttons to the relays to an alarm switched ground output. That is all there is to getting your doors to open all by themselves. |
|
Copyright © 1998-2006
Knight
Riders Automotive
Terms of Use
Policies
|